1. Calibrating the temperature (°C) reading of the IR-probe is done in three steps:
1. Setting calibration factors to default values.
2. Calculating the calibration gain.
3. Calculating the calibration offset.
2. Setting calibration factors to default values
1. Click on the Config tab. In the Scanner box, click on the Edit button to show the next dialog box.
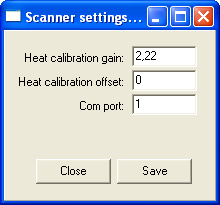
2. Make sure that the Heat calibration gain is set to 2.22 and that the Heat calibration offset is set to 0 (zero).
3. Click on the Save button.
4. Click on the Close button.
3. Calculating calibration gain
1. Point the IR-probe towards a surface with a low constant temperature, e.g. the black surface on top of the Scanner table.
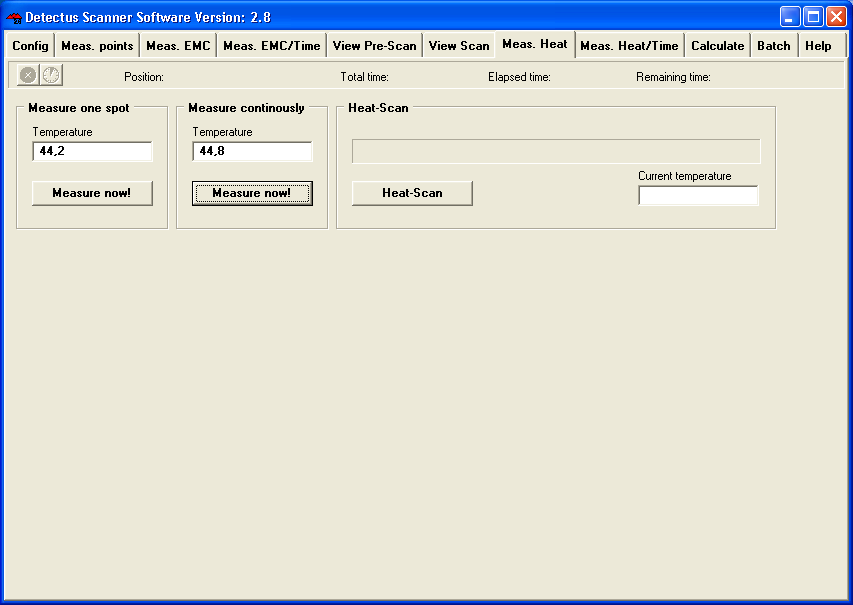
2. Click on the Meas. Heat tab.
3. In the Measure Continuously box, click on the button Measure Now button.

4. Make notes on the temperature reading on the screen and the temperature reading on the LCD display of the IR-probe.
5. Now point the IR-probe towards a surface with a high constant temperature.
6. Make notes on the temperature reading on the screen and the temperature reading on the LCD display of the IR-probe.
7. Calculate the new calibration gain using this formula: SCR1 = Low temperature shown on the screen.
LCD1 = Low temperature shown on the LCD display of the IR-probe.
SCR2 = High temperature shown on the screen.
LCD2 = High temperature shown on the LCD display of the IR-probe.
New calibration gain = (LCD2 – LCD1)/ (SCR2 – SCR1)*Old calibration gain
8. Cick on the Config tab.
In the Scanner box, click on the Edit button to show the next dialog box.

9. Enter the new Heat Calibration gain
10. Click on the Save button.
11. Click on the Close button.
12. Repeat the procedure until (LCD2 – LCD1)/ (SCR2 – SCR1) is near one.
4. Calculating calibration offset
1. Point the IR-probe towards a surface with a constant temperature, e.g. the black surface on top of the Scanner table.
2. Click on the Meas. Heat tab.
3. In the Measure Continuously box, click on the button Measure Now button.
4. Make notes on the temperature reading on the screen and the temperature reading on the LCD display of the IR-probe.
5. Calculate the new offset factor using this formula:
SCR = temperature shown on the screen.
LCD = temperature shown on the LCD display of the IR-probe
New calibration offset = LCD – SCR + old calibration offset.
6. Click on the Config tab.
In the Scanner box, click on the Edit button to show the next dialog box.

7. Enter the new Heat Calibration gain.
8. Click on the Save button.
9. Click on the Close button.
10. Repeat the procedure until the temperature reading on the screen and the temperature reading on the LCD display of the IR-probe are equal.
5. Changing the heat emission factor of the IR probe
The emission factor is the rate of energy emitted from the surface of the object in front of the probe. All objects possess a particular emission factor which changes according to the object’s conditions or temperature. Since the probe allows the emission factor to be set, even more precise measurements can be conducted by matching the emission factor of the object to be measured.
Objects with a low emission factor (e.g the surface of shiny metallic objects) reflect the surrounding temperature since they are reflective. In this case, it is necessary to block out these effects from the surrounding objects since incorrect measurements will result by reflecting these temperatures.
The emission factor normally has a maximum value of 1.00. However, taking into consideration the influence of the surrounding noise, the emission factor of the probe can be set up to 1.20.
6. This is how to change the emission factor of the probe:
1. Unscrew and remove the cover.
2. Press the enter button to enter setup mode. The button will light red.

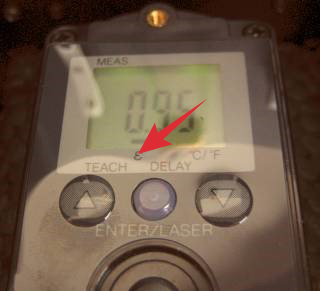
3. Press arrow buttons until the cursor on the display is above the “ε”
4. Press the enter button to select the emissivity setting mode.
5. Press the arrow buttons to adjust the emission factor.
6. Press the enter button to exit the emissivity setting mode.
7. Press the enter button to exit the setup mode.
8. Mount to cover.