1. A complete EMC Scanner setup consists of:
- EMC Scanner (included)
- Spectrum analyzer
- Near field probe
- Pre-amplifier
- Means for communication with the spectrum analyzer. If GPIB is required then National Instruments GPIB adapter
- PC with windows 10
- Detectus Scanning Software
2. Copyright
Information in this section is subject to change without notice and does not represent a commitment on the part of Detectus AB. The software, which includes information contained in any database, described in this document is furnished under the license agreement or nondisclosure agreement and may be used or copied only in accordance with the terms of that agreement. It is against the law to copy the software except as specifically allowed in the license or nondisclosure agreement. No part of this manual may be reproduced or transmitted in any form or by any means, electronic or mechanical, including photocopying and recording, for any purpose without the express written permission of Detectus AB.
© Copyright 1994 – 2021 Detectus AB. All rights reserved.
3. Before installing the software
Make sure that the PC complies with system requirements. (See technical data on page 5.)
If applicable, make sure that the GPIB-adapter is properly installed and that the diagnostic program provided by National Instruments confirms its functionality.
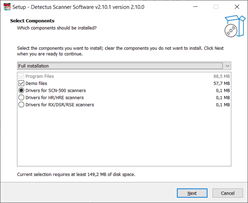
3.1. Installing the Software
1. Insert the USB stick provided with the EMC Scanner into the computer.
2. Run setupDD.exe on the USB stick.
3. Follow the instructions on the screen and select the drivers that suit your Scanner model. Demo files are optional.
4. Installing the Hardware
- Unplug the PC and Scanner from the power.
- Connect the RS-232 or USB cable between the PC and the Scanner.
- Connect the power, and then switch on the PC and the Scanner.
5. Setting up NI Visa and instruments with GPIB
Some spectrum analyzer drivers in DSS and all drivers for signal generators and EDDs are using National Instruments Visa. Therefore, it is required to install the NI Visa driver first. NI Visa, and instructions how to install it, can be downloaded at www. ni.com. Click Support and then NI Visa…
Below are step-by-step instructions how to connect Detectus DSS running on a Windows 7 PC to a Visa compatible instrument using GPIB.
1. Open National Instruments Measurement & Automation
2. Click on your GPIB adapter in the tree view.
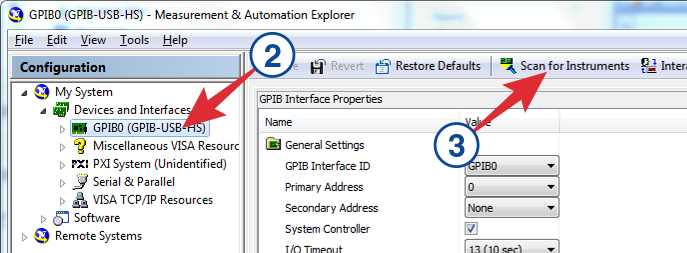
If you don’t see your GPIB adapter in the tree view then you need to install and configure it. Follow NI installation guidelines.
3. Click on “Scan for Instruments”
4. Now you should see your instrument at the bottom of the screen.

It is very important that you can see you’re your instrument in this list because otherwise DSS will not be able to connect to it.
6. Setting up NI Visa and instruments with LAN
Some spectrum analyzer drivers in DSS and all drivers for signal generators and EDDs are using National Instruments Visa. Therefore, it is required to install the NI Visa driver first. NI Visa, and instructions how to install it, can be downloaded at www.ni.com. Click Support and then NI Visa…
Below are step-by-step instructions how to connect Detectus DSS running on a Windows 7 PC to a Visa compatible instrument using LAN in a network where IP addresses are handled by a DHCP server. That is, a regular office network. A slightly more complicated procedure for connecting via a LAN cable directly is found in appendix 2.
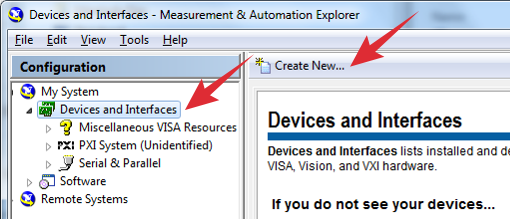
1. Open National Instruments Measurement & Automation
2. Click on your “Devices and interfaces” in the tree view and then click “Create New…”
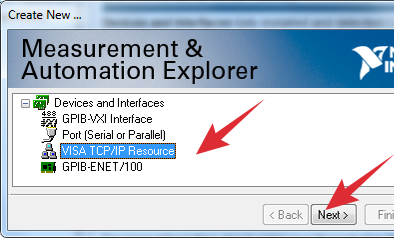
3. Select “VISA TCP/IP Resource” and then click Next
4. Select “Auto-detect of LAN Instrument” and then Click Next
5. Hopefully you now see your instrument in the list.
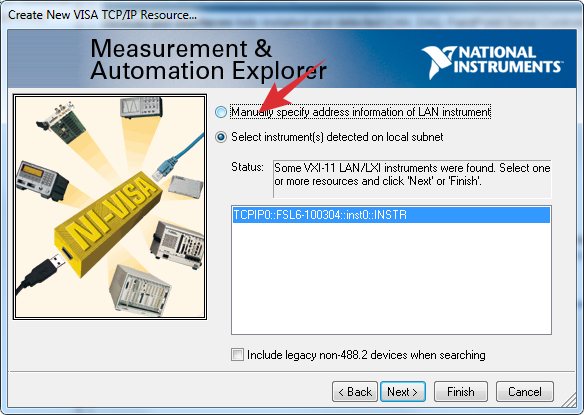
Like this: If your instrument is found then click “Finish” and skip forward to step 8. If your instrument is NOT found then you must select “Manually specify the address information of your instrument” and then click Next.
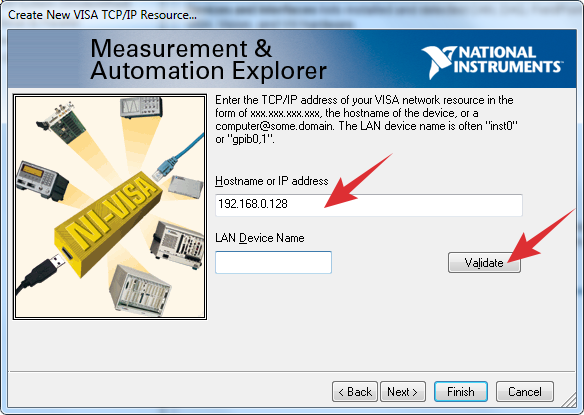
6. Type in the IP address of your instrument and click “Validate”
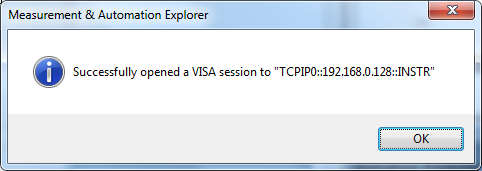
7. If you typed the correct IP address and your instrument is found then you should see this message. Click OK.
8. Now you should see your instrument in the tree view.
It is very important that you can see you’re your instrument
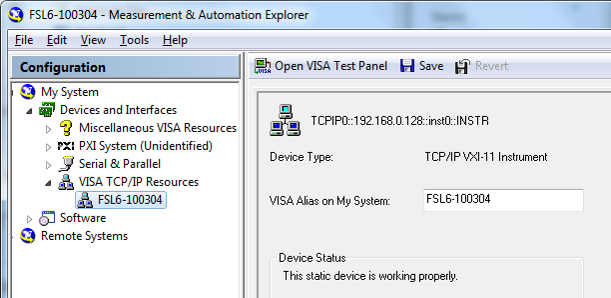
in the tree view because otherwise DSS will not be able to connect to it.