1. WINDOW LAYOUT
Start the program by double-clicking on its icon. The program window has areas dedicated for different things. The important ones, at this time, are shown in the drawing below:
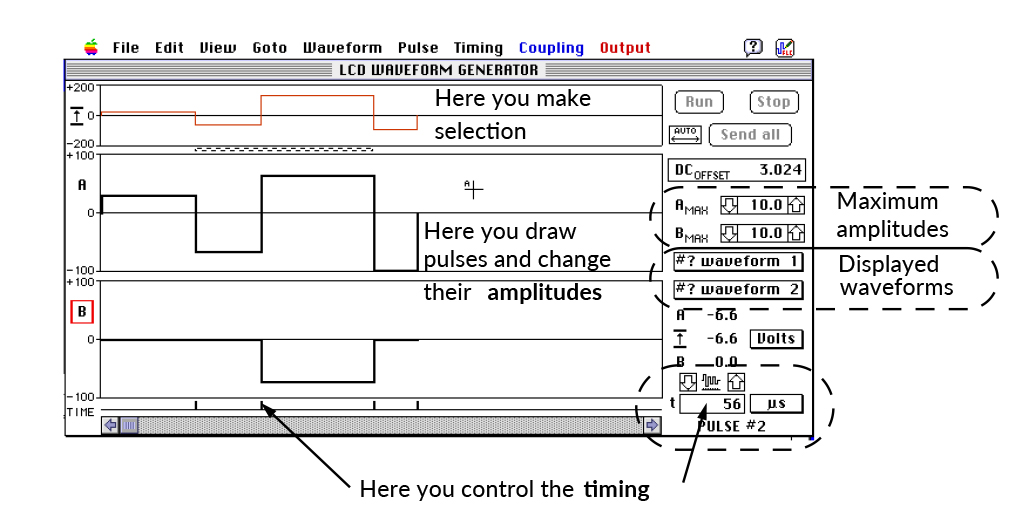
Remember that you change the pulse amplitude in the A or B pane, and its width by dragging the marker on the time axis. In the upper (superposition) pane you can only make a selection, which can be used for copy, paste, duplicate etc. commands. Parameters of the first pulse in the selection are always shown (in the bottom-right corner of the window).
2. DRAWING PULSES
Lets start from an empty screen, like the one you see just after starting the Waveform
Generator program (if you have already started to draw, use FILE->NEW to clean up). Point somewhere in the A pane, press the mouse button and keep it pressed down. You see a vertical line at the click point and the horizontal one between the beginning of the screen and the click-point. As you move the mouse up and down, the line marking the pulse amplitude moves within the maximum levels. There is another horizontal line in the upper part of the window showing the superposition of this pulse with the corresponding pulse in the B pane. Release the mouse button and the first pulse will be drawn:
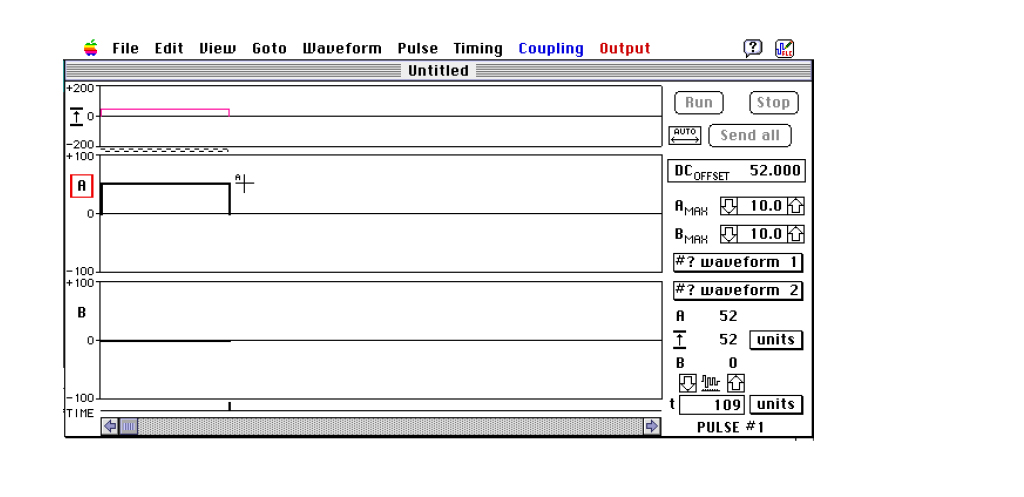
The width of your newly created pulse corresponds to the X-coordinate of the click-point. You may change it by dragging the pulse-boundary marker on the time axis, as shown in the next figure (PC-Windows only: you may also click with the right mouse button on the pulse amplitude).
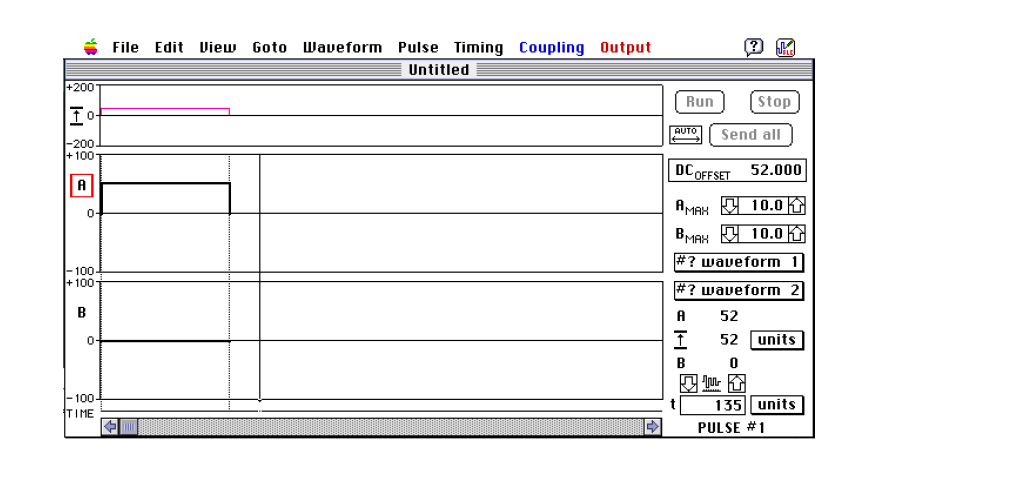
The broken vertical lines show the pulse width you are changing. The solid vertical line, which follow the cursor movements denotes the new position of the end of the pulse. You cannot move it more left than the beginning of the pulse, since a negative time would not make sense. The minimum width allowed is 2 units. You can move this vertical line almost as far right as you like – the screen will auto-scroll to make you more space. If you really drag it far you might encounter another limit at 32000 units, which is the maximum pulse width allowed by the generator hardware.
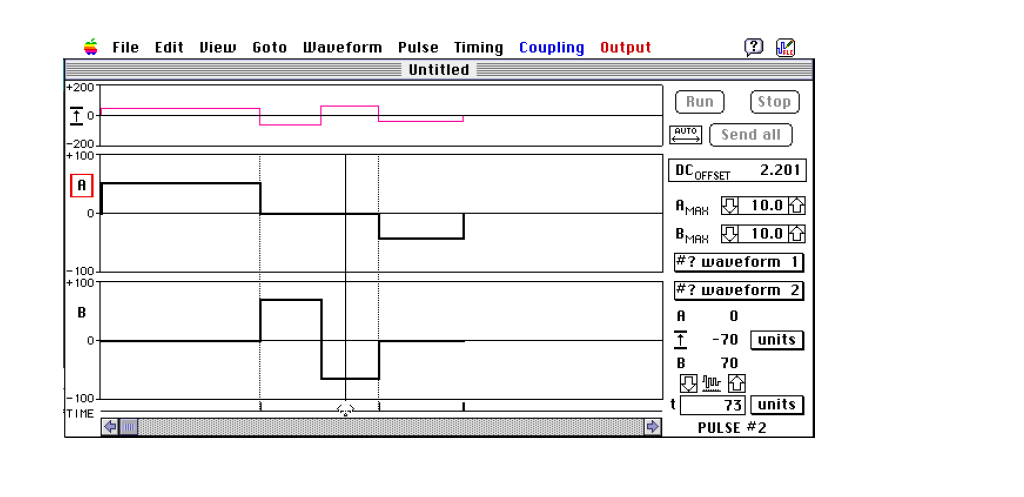
Click now in the B-pane, to the right of the pulse end. You will create a new pulse there. Observe that the red frame surrounding the letter A has now jumped to B. This symbol tells you which of the two waveforms is “active” (it is important if you, for example, want to copy the current selection of pulses – you take them from the active waveform). Try now to draw a screen like this:
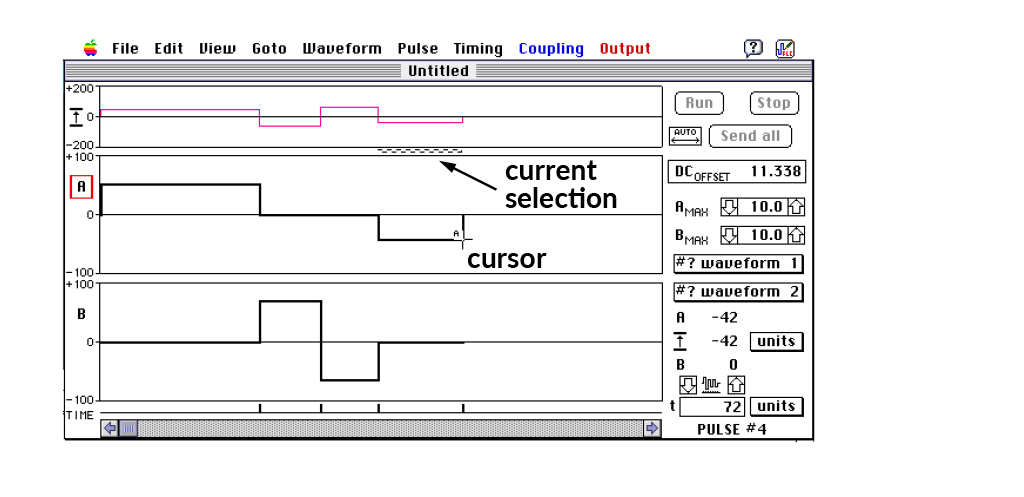
The last click created the pulse number 4 in the A-pane. The current selection is shown by an animated pattern (called “marching ants”) on the Mac and a grey box in Windows.
Remember: if you click on the existing pulse, you will change its amplitude. If you click to the right of the last pulse, you will create a new one. You know also that if you drag the pulse- boundary marker you will change the width. Try now to drag such marker with the “option” key pressed. Notice a change in the cursor shape! You are now moving the boundary between two pulses.(see fig. on the next page)
If you are not happy with the new width or amplitude of the pulse – just select “Undo” from the “Edit”-menu (or type cmd-Z). The text in the menu changes and always tells you what you can undo, which usually is the last editing action. (A few commands cannot be undone in such an easy way. The most “dangerous” ones will warn you before proceeding.) Most often you will like to create pulses of equal length. You may fix the desired width of all new pulses by using the menu PULSE->SET NEW PULSE WIDTH… (or type cmd-W). You will see a dialog asking you to type the desired (integer!) value. If you feel that you need a similar help with drawing the amplitudes, use menu VIEW->SET GRID->EQUAL STEPS…(or type cmd-Y). The default values are 20 in both cases. Let’s draw some steps:
Of course, you may prefer just to write the amplitude and length values for each pulse. Use menu PULSE->SET VALUES… or type cmd-A, and the following dialog window will appear:
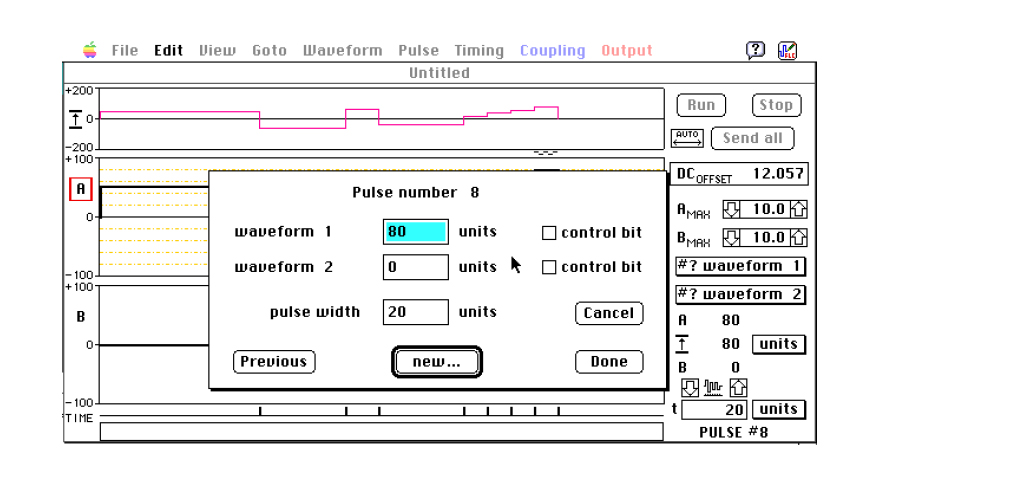
The default button is drawn with a thicker line and responds to the “Enter” and “Return” keys in all dialogs in the Waveform Generator program. The default button of the dialog above moves you to the right on the time axis. If you are at the last pulse (as in the picture above) it reads “New”, because it will create a new pulse for you. Otherwise it tells “Next” as opposed to the “Previous” button. Use TAB or shift-TAB to jump between the edit-fields. The “Cancel” button, which responds also to the “Escape” key, allows you to leave the dialog without making any change (this is also true for all dialogs in the Waveform Generator program). Click on “Done” button when you are ready. If you wonder what the “control bit” is: there is an output marked “C-BIT” on the front panel of each channel, if you click on the “control bit” check-box here, a logical “one” level will be generated from that output during this pulse.
You do not have to type everything by hand. There is a number of quite powerful editing commands for your assistance. As in nearly all programs there is an “Edit” menu, which has a copy, cut, paste and duplicate functions. Let’s try to use these simple commands now. And remember the rule: you always copy from, or paste into, the active waveform.
Let’s make a simple exercise. Select last 4 pulses in the A-waveform – point with the mouse on the first of them in the superposition pane, press the mouse button and drag to the right. The “marching ants” pattern will show the selection. (There are two other ways to make a selection – read the description of the PULSE menu). Choose EDIT->COPY or press cmd-C. Click on the B-letter (or anywhere to the left from Y-axis of the B-waveform) to select the B-waveform. Pressing a down-arrow key would also select the B-waveform. Choose EDIT->PASTE or press cmd-V. Your screen might now look like this:
OK, that was simple. But there is a snag in it: the copy always contains both the information about amplitudes and about the timing. Since we pasted the selection at the same place, only in the other waveform, there was no problem because there was no difference in timing. If we now paste our 4 pulses over the pulses from1 to 4, the widths of pulses in the copy and waveform differs, and we must decide what to keep. The default setting (as you start the program) is to override without asking both the existing amplitude and the existing timing.(Do not worry: the paste command can be undone). You may choose to override only the amplitude or only the timing or to be asked each time – call PREFERENCES… dialog from the EDIT menu to do this. With the default settings you would get:
Try now the INVERT SELECTION command (from EDIT menu, or press cmd-5/ctrl-F5). It will invert amplitudes of all pulses within the selection. Go back to A-waveform and try INVERT WAVEFORM command (cmd-6/ctrl-F6). If you wish to insert a pulse before the selection, use INSERT PULSE command (cmd-I) or if you need many pulses, call N*INSERT… instead.
The screen might look now like this:
The DUPLICATE command (cmd-D) copies the selected pulses and pastes them just after the selection.
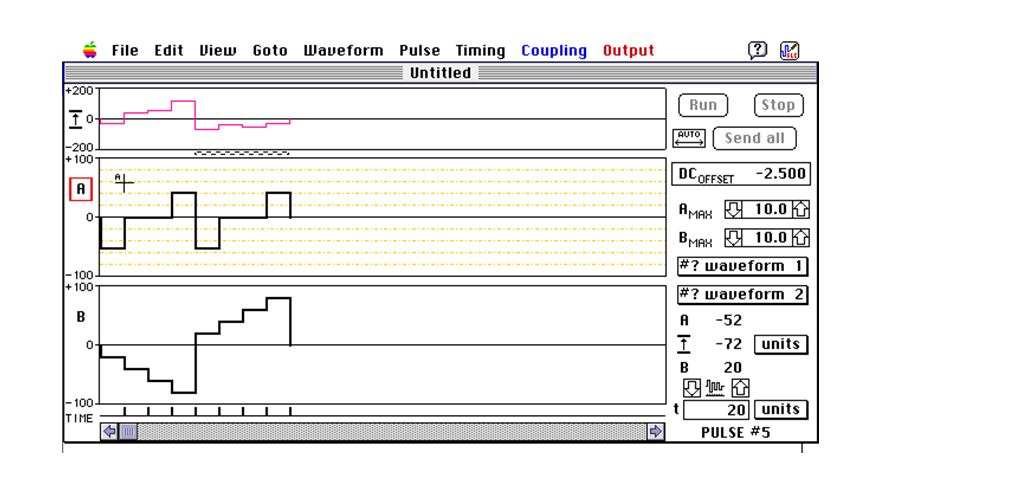
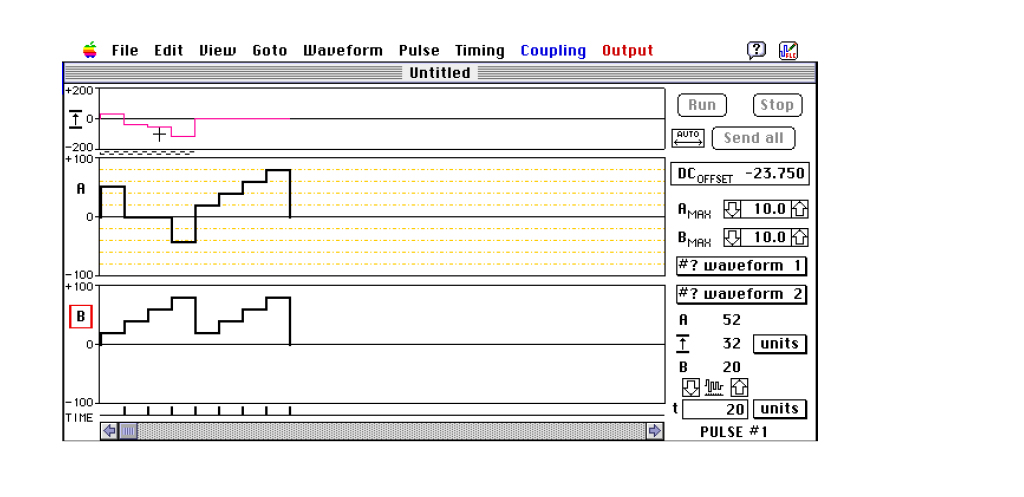
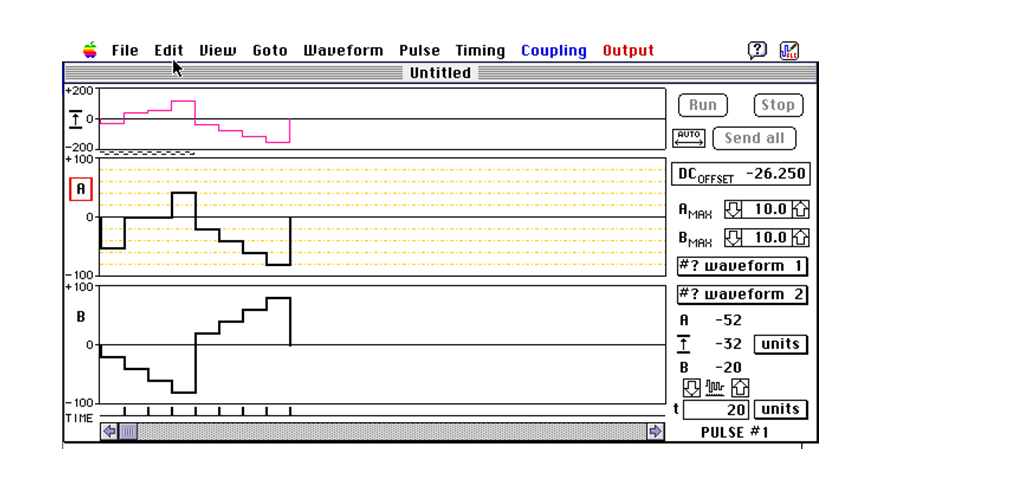
So far, we have been drawing amplitudes and widths in arbitrary units. The scale is, as you can see on the screen, ±100 amplitude unites. Thus, the superposition is in the range of ±200 units. The resolution of the screen within A- and B-pane is ±50 pixels. So, if you drag the amplitude you get only even values. Press option key to access the odd values.
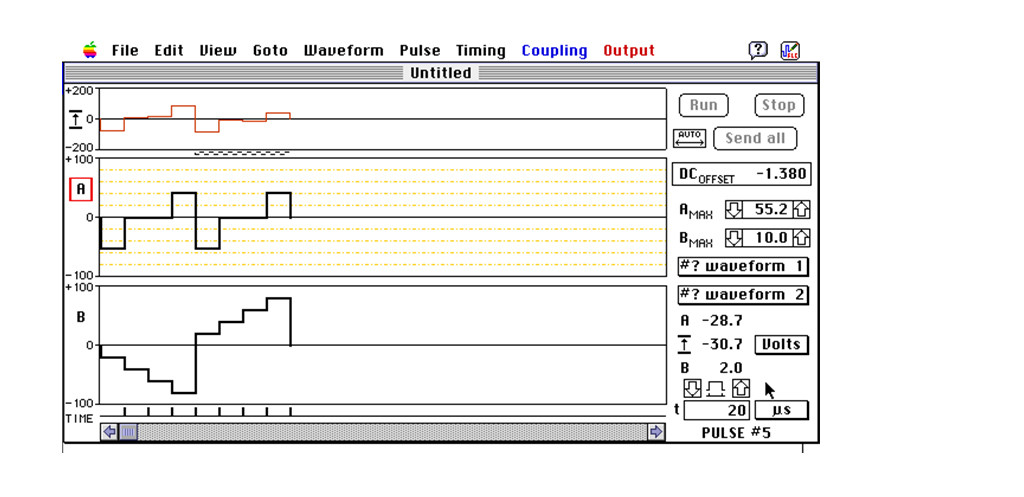
In the picture above 100 units correspond to 10 volts, as you can see in the maximum amplitude control panel. Click on an arrow symbol to increase or decrease this value in 1V steps or 0.1V steps if you press an option key. You can also click on the digital display and type a new value directly (in a dialog which will come up). If you now click on the pop-up menu (the rectangle with a shadow), you may change “units” to “volts” and the superposition waveform will be calculated according to max amplitude values for both waveforms (note the color change).
In the timing control you have more possibilities. You can read the pulse width in units, μs or ms. Not all the choices are available at the same time. They depend on the choice of the time-base clock, which you select using the TIMING menu.
Please notice the small symbol between the up and down arrows above the time-display. Normally it resembles a waveform. If you click on it, it changes to a symbol presenting a width of one pulse.
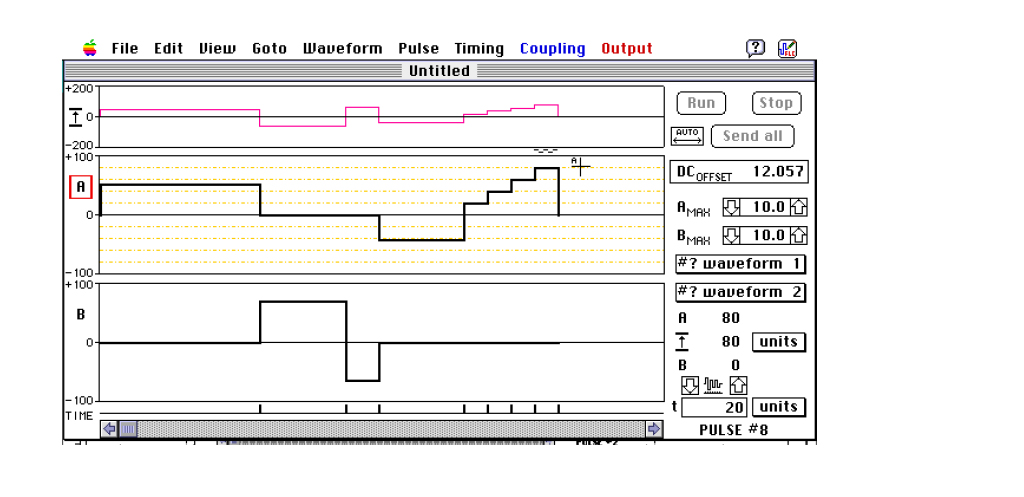
This symbol tells you what will change when you click on one of the arrows or the digital display. In the case as above, when one-pulse width symbol is shown, you will change the width of the selected pulse only (or the first pulse of the selection, like the pulse #5 in this example) and you will not alter other pulses. Let’s change it to 40 μs:
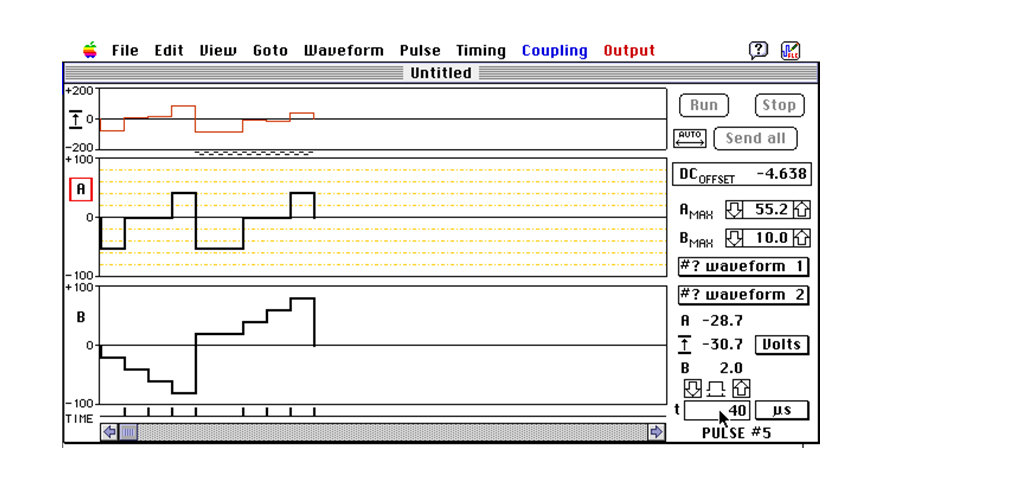
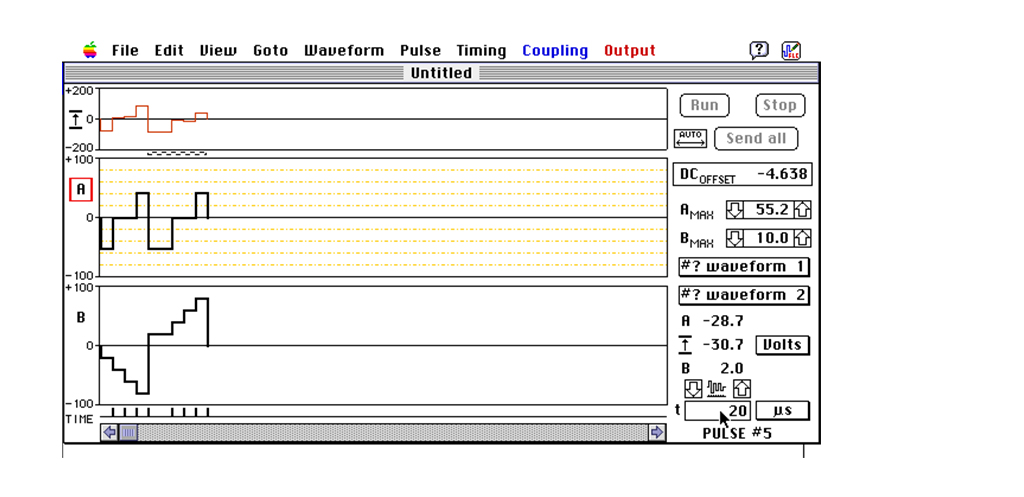
In the other case, when the waveform symbol is shown, you will scale the entire timing.
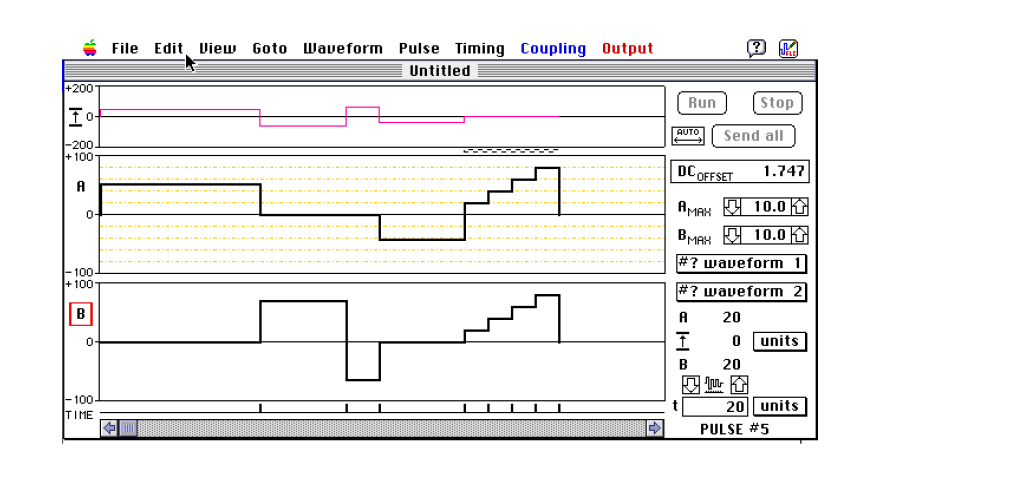
Let’s try it. Click on the mode symbol or use the menu TIMING->SCALE TIMING. The symbol changes. Click on the digital display. The dialog comes up (Mac only, in Windows you may edit the displayed text directly). The message in the dialog explains what you are about to do. Type 20 and press Enter key (or click on OK button if you like). We are changed the width of the pulse number five from 40 μs to 20 μs and at the same time we changed the widths of all other pulse by multiplying them by one half (20/40=0.5). The result you can see on the next figure.
If you think that the picture is too dense now, use a “Zoom” function from the “View” menu. You can zoom in or out in the ratio of 2 each time, but there is no limit on the zoom level. You might prefer to use the keyboard shortcuts: command + to zoom in, command – to zoom out and command 0 (zero) to return to the 1:1 scale.
And after zoom-in twice:

Please notice, that the display has scrolled to make the selected pulse number 5 well visible. Before proceeding to the next chapter, scroll it back to the first pulse by using the scroll bar or the menu GOTO->START or by pressing command-left cursor.
3. USING COUPLINGS BETWEEN PULSES
Quite often it is necessary to change parameters of many pulse at the same time. Doing it “by hand”, one by one, would not be a nice solution. Let the computer do the job! All you need is to describe the relations between these pulses. And you can do it using the COUPLING menu.
It works in the following way (let us start with the amplitudes, the timing is analogous). First you have to choose a reference pulse, we call it a “master”. Next you make another pulse to be this master’s “slave” and define the function for its amplitude:
Aslave = Amaster * factor + offset
You can create many “masters” and each of them may have many “slaves”. There is no limit on their number nor on their placement (different waveforms, even those not seen on the screen).
Let us make the pulse number 1 in the A-waveform a master-amplitude. If this pulse is not selected, click on it in the superposition pane and make sure that the red frame surrounds the “A” letter. Choose COUPLING->SET MASTER AMPLITUDE… and the dialog will be displayed asking you to type a name for this master pulse.
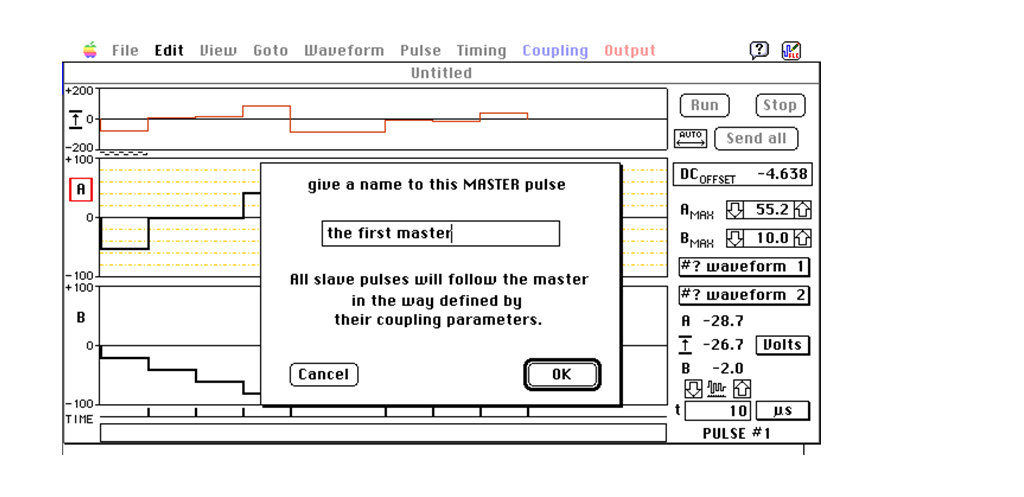
Type a name (like “the first master”, as in the example) and click OK.
Now go to the pulse number 4 and choose COUPLE TO… from the same menu (or press cmd-K). You will see another dialog. It has a pop-up menu to choose the master and two edit fields to write the equation describing the relation between this slave pulse and its master:
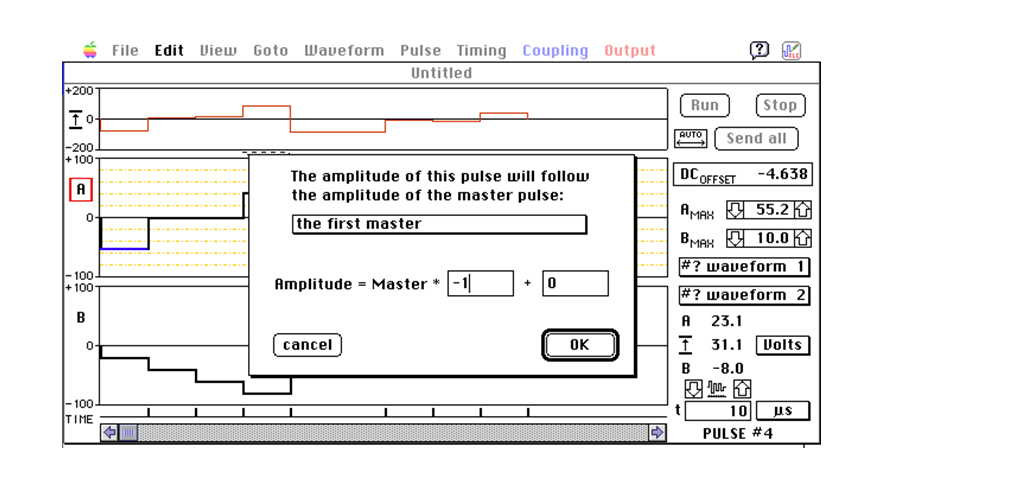
If you type the factor “-1” as in this example, the pulse number 5 will be a counter pulse of the pulse number 1. Click OK and try to change the amplitude of the master or the slave pulse to see how they follow each other.
Please notice that the horizontal lines in the coupled pulses have changed their color to red (master) or blue (slaves). In practice you do not need to care which pulse is a master and which is a slave (with one exception, see below). If you change an amplitude of a slave, it informs its master about this. The master calculates its own new amplitude and broadcasts it to all its slaves, which, in turn, change their amplitudes according to the programmed equation.
The only time you need to know which are the masters is when you want to delete some pulses or waveforms. If such selection contains a master, the computer will protest. The solution to your problem is quite simple – you just tell another slave to become a master. Then the old master will become a slave and you will be able to do whatever you like with it. The command is called PROMOTE TO MASTER.
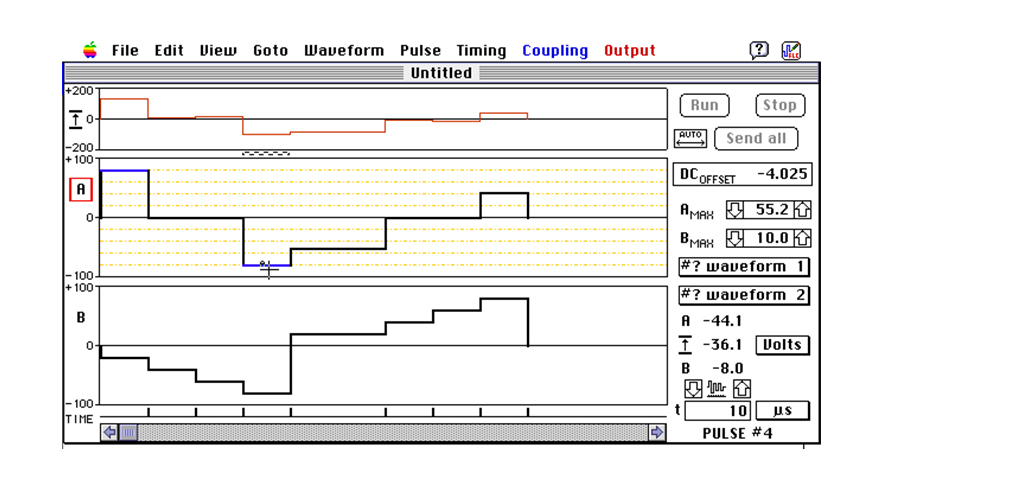
It is, of course, a lot of job to make slave pulses one by one. Try the following sequence of commands: zoom out once, select all, duplicate, copy, change to B-waveform, paste, invert selection. You should get something like this:
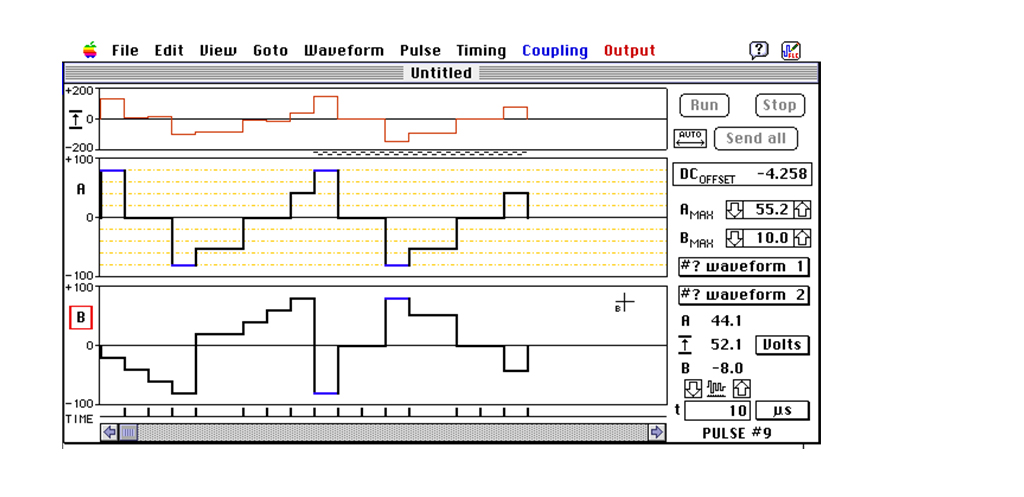
Try to change an amplitude of the coupled pulses and observe how they behave. You see that the copy/paste/duplicate commands create new slaves and the “invert” command changes the sign of the multiplication factor in the equation. So, you can create a master first and make all the slaves just by duplicating, copying, inverting, etc.
You may change the name of a master, jump to the master, clear one coupling chain or all couplings.